Using JBoss with Portlet Factory
On several projects I've had to develop portlets using WPF that are deployed to a Websphere Portal environment, but the options for executing in a development environment are a little limited. I can choose Websphere CE, Websphere Portal or Tomcat, and my first choice is usually Tomcat because it has a small footprint and fires up quickly. But in some cases I need to test some portal specific features like wiring or portlet configuration, and this requires a portal server. Websphere Portal is great for a production environment, but running it locally is not practical since it takes so many resources and has a long startup time.
Step 1
The platform definitions that show up in the project properties originate from files located in \IBM\Portlet Factory\Designer\FeatureSets\Web-App_7.0.0\Deployment\antscripts\platformdefs (or wherever WPF is installed). All I need to do is add my own file called JBoss.pfConfig, which is a copy of the Tomcat file looks something like this:
Step 2
The pfConfig refers to an ant file JBoss.xml which lives in \IBM\Portlet Factory\Designer\FeatureSets\Web-App_7.0.0\Deployment\antscripts\publish. Here again I copy from the Tomcat version and make a few changes:
Step 3
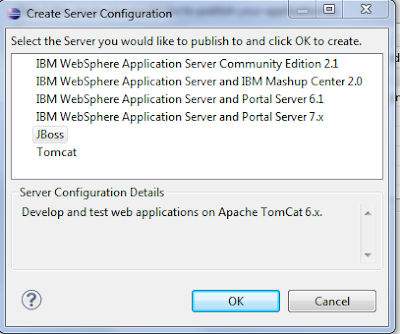
Well actually there is no step 3, I think that's all that is needed. When I look at my project properties I can now see JBoss as an available server:
There are a few caveats:
- In some earlier versions of WPF, the designer treats the JBoss configuration like Tomcat and strips off the .war file extension. Every time I explicitly deploy I get an error message and have to go back into the properties and put the extension back on. This doesn't happen when auto sync runs, only when an explicit deploy is requested.
- In WPF V7 the designer will complain about a missing exclude file the first time. Just add an empty file named \myproject\.deployment\excludes\jboss.excludes.
Running JBoss
At one point I was really under pressure to get some work done and I finally gave up on Websphere Portal and turned to JBoss Portal Server (looks like that project has been merged into project Gateln). Unfortunately WPF doesn't have a configuration option for JBoss so I had to roll my own.Step 1
The platform definitions that show up in the project properties originate from files located in \IBM\Portlet Factory\Designer\FeatureSets\Web-App_7.0.0\Deployment\antscripts\platformdefs (or wherever WPF is installed). All I need to do is add my own file called JBoss.pfConfig, which is a copy of the Tomcat file looks something like this:
wpf.installedappsdir=C:\jboss-portal-2.7.2\server\default\deploy
wpf.serverport=8080
wpf.serverUrl=localhost
wpf.servertype=appserver
wpf.servername=JBoss
wpf.config.antfile=JBoss.xml
wpf.config.publishtarget=publishJBoss
wpf.webxml.file=standalone.web.xml
wpf.autodeploy=false
wpf.configid=3
wpf.description=CreateServerDialog.TomcatDescription
Step 2
The pfConfig refers to an ant file JBoss.xml which lives in \IBM\Portlet Factory\Designer\FeatureSets\Web-App_7.0.0\Deployment\antscripts\publish. Here again I copy from the Tomcat version and make a few changes:
<!--Ant implementation for deploying to JBoss server.-->This is the script that the designer will invoke when publish application (V7) or build war for dev testing (V6.1.2) is selected.
<project name="jboss" basedir=".">
<!-- Target for deploying project to JBoss server. -->
<target name="publishJBoss">
<echo message="Publishing to JBoss server..." />
<!-- Copy project contents to server. -->
<copy todir="${wpf.installedappsdir}/${project.name}.war" preservelastmodified="yes">
<fileset dir="${webcontent.location}">
<include name="**/**" />
<excludesfile name="${webcontent.location}/.excludeFromServer" />
<excludesfile name="${webcontent.location}/../.deployment/excludes/allServers.excludes" />
<excludesfile name="${webcontent.location}/../.deployment/excludes/JBoss.excludes" />
</fileset>
</copy>
<!-- Copy the standalone web.xml file to the server. -->
<copy file="${webcontent.location}/WEB-INF/bin/deployment/standalone.web.xml" tofile="${wpf.installedappsdir}/${project.name}.war/WEB-INF/web.xml" />
</target>
</project>
Step 3
Well actually there is no step 3, I think that's all that is needed. When I look at my project properties I can now see JBoss as an available server:
There are a few caveats:
- In some earlier versions of WPF, the designer treats the JBoss configuration like Tomcat and strips off the .war file extension. Every time I explicitly deploy I get an error message and have to go back into the properties and put the extension back on. This doesn't happen when auto sync runs, only when an explicit deploy is requested.
- In WPF V7 the designer will complain about a missing exclude file the first time. Just add an empty file named \myproject\.deployment\excludes\jboss.excludes.


Comments
Post a Comment